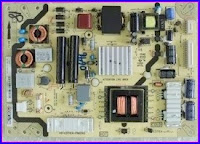
SONY KDL-42W800A - Service mode - LED Blinking and fault finding - Power supply Schematic diagram - LED Television repair and service

Category: LED Television Repair and Service 

Contents of this article 

  • How to access self diagnostics
  • How to activate Service mode
  • LED blinking code and causes  
  • Power supply circuit 


SONY KDL-42W800A

SERVICE MODE
How to enter the Service Mode
Service adjustments to this model can be performed using the supplied Remote Commander RM-ED011.
1. Turn on the power to the TV set and enter into the stand-by mode.
2. Press the following sequence of buttons on the Remote Commander.
(ON SCREEN DISPLAY) >  (DIGIT 5) > (VOLUME +) > (TV POWER)
4. Move to the corresponding adjustment item using the UP or DOWN arrow buttons on the Remote Commander.
5. Press the RIGHT  arrow button to enter into the required menu item.
6. Adjust the data value using the UP or DOWN arrow buttons on on the Remote Commander.
7. To go back at any time press the ‘Return’ button on the Remote Commander.
8. Press the ‘Menu’ button on the Remote Commander to quit the Service Mode when all adjustments have been completed.
Note : To place the Remote Commander in ‘Service Mode’ press the following buttons together for two seconds.
(ON SCREEN DISPLAY) >  (DIGIT 5) > (VOLUME +)
To use the Remote Commander in ‘Service Mode’ press the rewind button on the Remote Commander twice.
TT will then appear in the bottom right hand corner of the TV.
To take the Remote Commander out of ‘Service Mode’ press the same buttons above together again for two seconds or remove the batteries from the Remote Commander.
After carrying out the service adjustments, to prevent the customer accessing the ‘Service Menu’ switch the TV set OFF and then ON again.
SELF DIAGNOSTIC SOFTWARE
The identification of errors within the EG1L chassis is triggered in one of two ways :- 1: Busy or 2: Device failure to respond to IIC. In the event of one of these situations arising the software will first try to release the bus if busy (Failure to do so will report with a continuous flashing LED) and then communicate with each device in turn to establish if a device is faulty. If a device is found to be faulty the relevant device number will be displayed through the LED (Series of flashes which must be counted).
LED Error Codes
Number of LED Flashes
Error Description
Action
02
DC_DET (12V main voltage).
Goes into standby and LED flashes.
06
Panel Det error.
Goes into standby and LED flashes.
07
Internal temperature error.
Goes into standby and LED flashes.
08
Audio error (SP protection).
Goes into standby and LED flashes.
10
Digital error.
Adds error to error menu.
11
NVM error.
Adds error to error menu.
12
I2C error VCT.
Adds error to error menu.
13
Balancer error.
Goes into standby and LED flashes.
14
HDMI error.
Adds error to error menu.
15
Tuner Error
Adds error to error menu.
16
I2C CH1 (VERD TAS).
LED error.
17
I2C CH0 (VERD NVM/RTC).
LED error.
18
Digital demod.
Adds error to error menu.
19
USB error
Adds error to error menu.
20
CI error
Adds error to error menu.
21
VCT error
LED error.
22
MSP error.
Adds error to error menu.
 Self Diagnostic Screen Display
To bring up the self diagnostic screen display
In standby mode, press the following sequence of buttons in quick succession on the remote commander as shown below:
(ON SCREEN DISPLAY) >  (DIGIT 5) > (VOLUME +) > (TV POWER)

POWER SUPPLY CIRCUIT 
CLICK ON THE IMAGE TO ZOOM IN 

SONY KDL-32EX40B – Power supply Trouble shooting – Led blinking codes and causes – Tcon Board troubleshooting – LCD televisions repair and service

Category: LCD Television Repair and Service 

Contents of this article 

  • Power supply troubleshooting 
  • Tcon board troubleshooting 
  • LED blinking and causes 


SONY KDL-32EX40B

Power Supply Troubleshooting
Failures in the power supply circuits that prevent the unit from turning on are caused by one of the following scenarios:
# Complete failure of the standby and main power supplies
# Failure of the main supply including the main switching regulator, PFC circuit, main relay and other components required to turn the circuits on.
# The power supply is not receiving a turn-on command from the CPU
Completely Dead Set
A complete power supply failure is generally the result of severe transients in the AC line such as those incurred during an electrical storm. The EX40B model line utilizes a red standby LED located on the lower left front bezel that is lit whenever the unit is receiving AC power and is turned off. These models incorporate a, “eco” switch located on the lower right side which, when turned off, remove all AC power from the unit and produces the same symptom of a unit that has been unplugged or lost its AC power. This switch should be checked first whenever the standby LED is not lighting.
Won’t Power On
This situation assumes that the red standby LED is lit when AC power is applied to the unit. A lit standby LED indicates that the standby power supply is operational, and the CPU on the BAL board is at least partly operational. In this case it is likely that the main power supply is either not being turned on or it has failed.
Service Tip: If the standby LED is lit but the unit will not power on, remove AC power from the unit. This can be done by unplugging the AC cord or turning off the “eco” switch. Wait about 6 minutes and re-apply AC power. You should hear a distinct click of the main relay which will engage for about 5 minutes before releasing again. If the relay clicks on, the poweron command line from the CPU is functional and the problem most likely resides on the power supply board. Use the power-on button on the right side of the unit to attempt a turn-on and eliminate a defective remote control system.
Protection Shutdown
Critical voltages and circuit operations are monitored by the CPU on the BAL board. If a fault is detected the unit will be forced to shut down by the CPU. The monitored circuit in which the fault occurred will cause the CPU to flash the standby LED in groups of repeating sequences. The number of blinks in these groups identifies which voltage or circuit caused the protection event.
Not all of the available protect codes are used. Models that are LED backlit do not use the 4-blink balancer error as this circuit is found in models that are backlit with fluorescent lamps. The following list contains the protect circuits and diagnostics codes used in the EX40B models.
2X: A loss of REG12V from the power supply triggers this protect event. The usual cause is a failure of the main switching supply. In some instances, excessive loading on the secondary supply lines can cause the switching regulator to stop, or fail again, if a replacement board is installed.
3X: The REG 5V and D3.3V source originating on the BAL board is monitored for low-voltage conditions by CPU IC5000. A failure causing a 3X shutdown would require replacement of the BAL board.
5X: A communications error with the high frame-rate or timing control circuits has occurred. Since both of these circuits are located on the TCON board, replacement of the board should remedy the problem. In rare cases a loose or defective LVDS cable could be the cause. If the TCON board is not available as a separate part, the entire LCD panel must be replaced.
6X: If the inverter circuits fail to generate high voltage or one or more of the backlight lamps fails to light, the television will shut down and display this diagnostics error.
7X: A digital thermometer IC located on the BAL board provides a temperature reading of the chassis and LCD panel. If the temperature exceeds a pre-determined point the unit will shut down. If this problem occurs immediately at turn-on, the temperature sensing IC has failed and replacement of the BAL board is required. If this occurs after the unit has been running for a while, check for ventilation issues that could cause the unit to run hotter than normal. The RGB light sensor located on the HLR board communicates with the CPU on the BAL board via the same I2C bus as the thermal sensor. If this component loads the bus it will create a 7X shutdown. Disconnecting CN001 from the HLR board and power the unit up from the manual power button is an effective way to isolate this condition. If the unit remains on, the HLR board must be replaced.
TCON Troubleshooting
LCD Panel Basics
LCD panels have steadily evolved over the last several years. New designs of the physical structure of the LCD crystals have greatly improved the contrast ratio and viewing angle. Quicker response times and increased refresh rates have helped to reduce the motion “smear” associated with LCD displays. Backlighting design has also aided in producing a picture with color temperatures to make the images as true as possible. With all these design improvements, one aspect of the LCD panel remains relatively the same: Processing of the video signal Figure bellow illustrates a typical LCD panel and the associated video processing circuits as found in the WAX3 chassis. The various formats and resolutions of video signals are processed on the BU1 board. All video signals exit the video processor in the native resolution of the LCD panel. In this design, the resolution is for a 1366 by 768 at 60HZ refresh rate panel. 48 horizontal lines are discarded to match up to the 720p resolution of the ATSC specifications so the video will exit as 720p. The LCD panel used in this model processes 8-bit RGB video data. Before the video information can be sent to the TCON board it must be converted to a format that allows for practical and noise-free transmission. The large number of parallel lines to transmit the 8-bit RGB data would need to be sent on differential lines for noise reduction. This would require 48 lines just for the video. The TCON circuit also requires B+, ground connections, a communications bus, sync, and a clocking line transmitted differentially so we can see that up to 60 lines would be required for an 8-bit video signal and significantly more lines for a 10-bit processor. The practical way to transmit this information is to convert the parallel video data to a serial stream and this is accomplished by the Low-Voltage Differential Signaling (LVDS) transmitter.
The LVDS transmitter contains a circuit to serialize the parallel data. The parallel video information along with sync and clocking data are transmitted via twisted line pairs. Depending on the logic level, current is sent along one or the other of the twisted pair of wires. The receiving end of the wires is loaded with a resistor (usually around 100 to 120 ohms). The receiver detects the polarity of the voltage drop across the resistor to determine the logic level. The current level swings in the wire are about 3ma with a voltage differential of around 350mv. This allows for transmission of the video signal with minimal EMI. The LVDS receiver on the TCON board converts the serialized data back to parallel. This data is processed by the timing control IC to allocate the RGB data into serial streams for processing by the LCD panel. The TCON transmits the pixel control data to the panel via flat, flexible circuit board cables which can number 2 or 4 depending on the bit rate and refresh timing of the panel. A 1366 X 768 panel requires about 180 lines to transmit control information and B+ from the TCON. This number of control lines is not even close to the number of horizontal or vertical rows of pixels so the LCD panel must use this information to further expand the ability to turn on each individual crystal. The process will be explained in the gate and source driver paragraphs. All of this is accomplished by the TCON board. The term “TCON” is short for Timing Control. Other LCD panel manufacturers may have a different name for this particular circuit but the term used by Sony will always be TCON.

Gate Drivers
Note the IC’s located along the side of the panel. These IC’s are mounted on a flexible cable(s) which are bonded to the LCD panel. Their function is to activate each row of pixels one at a time starting with the first line at the top. As each line is activated, the source drivers turn on the appropriate liquid crystals for the frame of video about to be displayed. This continues from top to bottom until the entire frame of video is displayed. The process is repeated for the next frame. This rate can vary from 60 times per second or be increased to 120 or 240 as found in the high-frame-rate panels.
Source Drivers
These IC’s provide the control voltages to turn on each RGB segment of the vertical rows of pixels. In this example, the panel has a horizontal resolution of 1366 pixels. Each pixel is made up of a red, green and blue liquid crystal which means there are 4,098 columns to control. The source drive IC’s contain shift registers along with buffer switches. Shift registers are used to convert serial data to parallel. By using this method, the TCON is able to transmit control information to each of the source drivers using serial data lines. If the TCON is transmitting 8-bit data to the panel, each data line is capable of controlling 256 lines exiting the source drivers. Understanding how the gate and source drivers work together makes it easier to observe a problem on the screen and determine if the failure is panel or TCON related.
Diagnosing a Failed TCON
In order for this concept to move forward successfully, it is important that the service industry be able to properly identify the symptoms of TCON issues to avoid unnecessary service calls and repair costs. Accurate analysis of TCON failures will reduce costs significantly (both in parts costs and time) when warranty repairs are involved and will reduce the number of COD repairs that are lost.
A good approach when determining a TCON failure is a good understandin of which symptoms ARE NOT caused by the TCON. Examples are as follows:
Video Process Failures: All video inputs received by the video process circuits are handled on a frame-by-frame basis. The video frames are converted and scaled to 8 or 10-bit RGB information. It is virtually impossible for the video process circuits to cause a problem on a specific area of the screen. Failures on this board usually appear as distortions, color level shifts, video level shifts, noise that involves the entire picture, or no picture at all. The TCON can generate symptoms that appear to be video process related but the video process circuits cannot produce the symptoms of a failed TCON circuit. LVDS Cable Failures: Although problems with the LVDS cable or connectors can generate symptoms of TCON failures this usually tends to be intermittent and wiggling of the connectors will usually provoke a change in the symptom on the screen. LVDS cables and connectors have become rather robust over the past few years and most problems are caused by technicians who damage them and this is generally quite obvious upon close examination. LCD Panel Failures: Some LCD panel failures could possibly be mistaken for TCON issues. Other than damage to the LCD glass, most panel failures are isolated to a particular area of the screen. Since the TCON disperses the pixel data to groups of line and column drive IC’s situated on the outer edges of the panel, it is unlikely that more than one of these IC’s would fail at the same time. Multiple columns of stuck on or stuck off pixels are, therefore, more likely to be the fault of the TCON circuits. The same applies to a single row of lit or unlit pixels. The TCON simply cannot cut out a single line of information.
Failures involving the LCD panel are usually displayed with the following symptoms:
# Physical damage such as cracks in the panel, a single pixel or group of pixels that always on or off, or random sections of the panel which are completely dark.
# Source driver failure. This symptom appears as a single vertical band around 1 to 2 inches (depending on the panel size) and can be black, white, or any other color. It can also contain video information with distortion. A single vertical line that is dark or colored. This may be due to a tab bonding failure from the IC to the panel but either cause requires the replacement of the panel.
# Gate driver failure. These IC’s operate in a “bucket brigade” fashion. As mentioned earlier, the gates drivers scan each horizontal line starting at the top. If any one of the gate drivers fails, all of the subsequent drivers below it will fail to operate properly. This symptom is usually indicated by normal video on the upper portion of the screen followed by distorted video from the point of the failed IC and downward.
# Any horizontal lines. The gate drivers are activated by a single source of timing information so any single horizontal line or groups or random horizontal lines are caused by an output failure from a gate driver or a loss of the tab bond to the panel.
TCON Failures
Failures in the timing control circuits of the TCON can produce symptoms of absolutely no video or generate lines and patterns that usually cover all or a substantial part of the screen. Determining if the TCON is thecause of a “no video” condition is a bit more difficult since there are no indications on the screen to analyze.
Troubleshooting a “DEAD” TCON
Many of the Sony television models over the last few years will detect a TCON that has completely failed. The communications data between the video process circuits and the TCON will cease to communicate if the TCON fails completely. This will cause the television to shut down and display a diagnostics code indicating a failure of the TCON. Not all chassis designs have this feature and it is not found on older models. The typical scenario when this failure arises is for the technician to bring a video process board to the repair location. It is usually safe to assume that the problem lies on the TCON board if the replacement video board does not remedy the problem since it is highly unlikely that a replacement board with the same failure was received. One trick to check most TCONS for functionality is to loosen the LVDS connector at the TCON (as shown In Figure 4-3) while the unit is turned on. Handle the LVDS connector with care and be certain to fully release the lock tabs. Gently rock the cable in and out of the connector while observing the screen for any response. Depending on the chassis, the symptoms of the screen may be gentle white flashes, intermittent colored lines, or a screen full of random patterns. The idea at this point is to provoke some kind of response on the screen. TCON boards that have failed will not usually generate any type of response on the screen. Another helpful procedure is to rapidly heat and/or cool the TCON with hot air devices or circuit coolant and watch for patterns to appear on the screen. 
Figure illustrates 2 examples of a loss of control data to the drive IC’s. In the first example, an entire group of column drivers has lost the data stream for red. The second example involves the complete loss of drive data for all RGB information to the right side of the screen. This is sometimes caused by the flat cable connecting the TCON to the LCD panel coming loose. The area of missing video can be dark or completely white depending on the panel design.

Service Tip: Select an inactive input (or one that is known to be a 4:3 SD source) and toggle between the “normal” and “zoom” modes. If the lines follow the zoom changes, the problem is located on the video process board. If they stay in the same place, they are originating in the TCON or LCD panel.

How to enter service mode Panasonic LCD TV - PANASONIC TX-P42X20L - TX-P42X25 - TX-PF42X20 - Service mode - Led blinking Error code - Self check - Data copy - LCD Television repair and service

Category: LCD Television Repair and Service 

Contents of this article 

  • Service mode Access
  • LED Blinking code and causes 
  • Self check mode
  • Data copy procedure 

PANASONIC TX-P42X20L - TX-P42X25 - TX-PF42X20

Replacement of ICs
When Peaks IC (IC8001) is replaced, EEPROM (IC8950) should be also replaced with new one the same time. When EEPROM (IC8950) is replaced, Peaks IC (IC8001) is not necessary to be replaced the same time.
After the replacement of IC, SELF CHECK should be done to generate the final KEY data.
How to SELF CHECK: While pressing [VOLUME ( - )] button on the main unit, press [MENU] button on the remote control for more than 3 seconds.
TV will be forced to the factory shipment setting after this SELF CHECK.
Service Mode
How to enter into Service Mode
While pressing [VOLUME ( - )] button of the main unit, press [0] button of the remote control three times within 2 seconds.
Key command
[1] button...Main items Selection in forward direction
[2] button...Main items Selection in reverse direction
[3] button...Sub items Selection in forward direction
[4] button...Sub items Selection in reverse direction
[RED] button...All Sub items Selection in forward direction
[GREEN] button...All Sub items Selection in reverse direction
[VOL] button...Value of sub items change in forward direction ( + ), in reverse direction ( - )
How to exit
Switch off the power with the [POWER] button on the main unit or the [POWER] button on the remote control.
Service tool mode
How to access
1. Select [SRV-TOOL] in Service Mode.
2. Press [OK] button on the remote control
Display of SOS History
SOS History (Number of LED blinking) indication.
From left side; Last SOS, before Last, three occurrence before, 2nd occurrence after shipment, 1st occurrence after shipment.
This indication will be cleared by [Self-check indication and forced to factory shipment setting].
POWER ON Time, On/Off
Note : To display TIME/COUNT menu, highlight position, then press MUTE for 3sec.
Time : Cumulative power on time, indicated hour : minute by decimal
On/Off : Number of On/Off switching by decimal
Note : This indication will not be cleared by either of the self-checks or any other command.
Exit
1. Disconnect the AC cord from wall outlet or switch off the power with [ Power ]
Hotel mode
Access command to the Hotel mode setup menuIn order to display the Hotel mode setup menu, please enter the following command (within 2 second). [TV] : Vol. [Down] + [REMOTE] : AV (3 times)
To exit the Hotel mode setup menu
Disconnect AC power cord from wall outlet.
Data Copy by SD Card
Preparation
Make pwd file as startup file for (a) or (b) in a empty SD card.
1. Insert a empty SD card to your PC.
2. Right-click a blank area in a SD card window, point to New, and then click text document. A new file is created by default (New Text Document.txt).
3. Right-click the new text document that you just created and select rename, and then change the name and extension of the file to the following file name for (a) or (b) and press ENTER.
File name:
(a) For Board replacement : boardreplace.pwd
(b) For Hotel : hotel.pwd
Note:
Please make only one file to prevent the operation error.
No any other file should not be in SD card.
Data copy from TV set to SD Card
1. Turn on the TV set.
2. Insert SD card with a startup file (pwd file) to SD slot.
On-screen Display will be appeared according to the startup file automatically.
3. Input a following password for (a) or (b) by using remote control.
(a) For Board replacement : 2770
(b) For Hotel : 4850
Data will be copied from TV set to SD card.
It takes around 2 to 6 minutes maximum for copying.
4. After the completion of copying to SD card, remove SD card from TV set.
5. Turn off the TV set.
Note:
Following new folder will be created in SD card for data from TV set.
(a) For Board replacement : user_setup
(b) For Hotel : hotel
Data copy from to SD Card to TV set
1. Turn on the TV set.
2. Insert SD card with Data to SD slot.
On-screen Display will be appeared according to the Data folder automatically.
3. Input a following password for (a) or (b) by using remote control.
(a) For Board replacement : 2771
(b) For Hotel : 4851
Data will be copied from SD card to TV set.
4. After the completion of copying to SD card, remove SD card from TV set.
(a) For Board replacement : Data will be deleted after copying (Limited one copy).
(b) For Hotel : Data will not be deleted and can be used for other TVs.
5. Turn off the TV set.
Note:
1. Depending on the failure of boards, function of Data copy for board replacement does not work.
2. This function can be effective among the same model numbers.
Check of the IIC bus lines
How to access
Self-check indication only:
Produce TV reception screen, and while pressing [VOLUME ( - )] button on the main unit, press [OK] button on the remote control for more than 3 seconds.
Self-check indication and forced to factory shipment setting:
Produce TV reception screen, and while pressing [VOLUME ( - )] button on the main unit, press [MENU] button on the remote control for more than 3 seconds.
Exit
Disconnect the AC cord from wall outlet or switch off the power with [ Power ] button on the main unit.
Power LED Blinking
When an abnormality has occurred the unit, the protection circuit operates and reset to the stand by mode. At this time, the defective block can be identified by the number of blinks of the Power LED on the front panel of the unit.
CLICK ON THE IMAGE TO ZOOM IN 
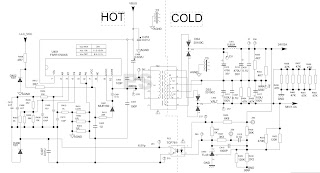
TCL 40-E371C4-PWA1XG - SMPS power supply - troubleshooting - schematic diagram - LCD television repair and service

Category: LCD Television Repair and Service 

Contents of this article 

  • Troubleshooting the power supply 
  • FSFR1700XS Details
  • FAN7930 Details 
  • Power supply Schematic 


TCL 40-E371C4-PWA1XG 

TROUBLESHOOTING 
1. Fuse blowing
Check Diode D1 > D4 for any short
Check the IGBT K12A50D For any short.
Replace FAN7930 Pwm driver
2. Power supply doesn’t starts
Check the resistors R307,R308,R309,R310 , is any of them is open or not . This resistor network provides the staring supply to FAN7930.
Replace FAN7930 , FSFR1700XS
Check the diode at the secondary side or the SMPS for any short. 
FSFR1700XS
The FSFR-XS series includes highly integrated power switches designed for high-efficiency half-bridge resonant converters. Offering everything necessary to build a reliable and robust resonant converter, the FSFR- XS series simplifies designs while improving productivity and performance. The FSFR-XS series combines power MOSFETs with fast-recovery type body diodes, a high- side gate-drive circuit, an accurate current controlled oscillator, frequency limit circuit, soft-start, and built-in protection functions. The high-side gate-drive circuit has common-mode noise cancellation capability, which guarantees stable operation with excellent noise immunity. The fast-recovery body diode of the MOSFETs improves reliability against abnormal operation conditions, while minimizing the effect of reverse recovery. Using the zero-voltage-switching (ZVS) technique dramatically reduces the switching losses and significantly improves efficiency. The ZVS also reduces the switching noise noticeably, which allows a small- sized Electromagnetic Interference (EMI) filter. The FSFR-XS series can be applied to resonant converter topologies such as series resonant, parallel resonant, and LLC resonant converters.
PIN CONFIGURATION OF FSFR1700XS
1 VDL - This is the drain of the high-side MOSFET, typically connected to the input DC link voltage
2 AR - This pin is for discharging the external soft-start capacitor when any protections are triggered. When the voltage of this pin drops to 0.2 V, all protections are reset and the controller starts to operate again.
3 RT- This pin programs the switching frequency. Typically, an opto-coupler is connected to cont the switching frequency for the output voltage regulation.
4 CS - This pin senses the current flowing through the low-side MOSFET. Typically, negative voltage is applied on this pin.
5 SG - This pin is the control ground.
6 PG - This pin is the power ground. This pin is connected to the source of the low-side MOSFET.
7 LVCC - This pin is the supply voltage of the control IC.
8 NC - No connection.
9 HVCC - This is the supply voltage of the high-side gate-drive circuit IC.
10 VCTR - This is the drain of the low-side MOSFET. Typically, a transformer is connected to this pin.
FAN7930
The FAN7930 is an active power factor correction (PFC) controller for boost PFC applications that operate in critical conduction mode (CRM). It uses a voltage-mode PWM that compares an internal ramp signal with the error amplifier output to generate a MOSFET turn-off signal. Because the voltage-mode CRM PFC controller does not need rectified AC line voltage information, it saves the power loss of an input voltage sensing network necessary for a current-mode CRM PFC controller. FAN793O provides over-voltage protection, open- feedback protection, over-current protection, input- voltage-absent detection, and under-voltage lockout protection. The PFC-ready pin can be used to trigger other power stages when PFC output voltage reaches the proper level with hysteresis. The FAN7930 can be disabled if the INV pin voltage is lower than O.45\/ and the operating current decreases to a very low level. Using a new variable on-time control method, THD is lower than the conventional CRM boost PFC ICs.
PIN CONFIGURATION OF FAN7930
1 INV
This pin is the inverting input of the error amplifier. The output voltage of the boost PFC converter should be resistively divided to 2.5V.
2 RDY
This pin is used to detect PFC output voltage reaching a pre-determined value. When output voltage reaches 89% of rated output voltage, this pin is pulled HIGH, which is an (open drain) output type.
3 COMP
This pin is the output of the transconductance error amplifier. Components for the output voltage compensation should be connected between this pin and GND.
4 CS
This pin is the input of the over-current protection comparator. The MOSFET current is sensed using a sensing resistor and the resulting voltage is applied to this pin. An internal RC filter is included to filter switching noise.
5 ZCD
This pin is the input of the zero-current detection block. If the voltage of this pin goes higher than 1.5V, then goes lower than 1.4V, the MOSFET is turned on.
6 GND
This pin is used for the ground potential of all the pins. For proper operation, the signal ground and the power ground should be separated.
7 OUT
This pin is the gate drive output. The peak sourcing and sinking current levels are +500mA and - 800mA, respectively. For proper operation, the stray inductance in the gate driving path must be minimized.
8 Vcc
This is the IC supply pin. IC current and MOSFET drive current are supplied using this pin.

POWER SUPPLY SCHEMATIC DIAGRAM 
PFC SECTION 
SMPS SECTION 
CLICK ON THE IMAGES TO ZOOM IN 

Samsung UE32D4000 POWER SUPPLY - BN 44-00421A - fault finding - Schematic diagram - Fuse blowing - Using IC FAN7602 - TF12N65 - Led television repair and service

Category: LED Television Repair and service 


Contents of this article 

  • Power supply schematic 
  • LED driver Schematic
  • Troubleshooting 

Samsung UE32D4000

Troublshooting 
Fuse blowing:
If the fuse is blowing of continuously then check the flowing components 
MOV VX801s – If it’s found short then replace it 
Bridge rectifier BD810 – Check is any one of the diode is short or not 
Check the IGBT TF12N65 For any short if found short replace it  
Replace ICM801 FAN 7602
ABOUT FAN7602 PWM Controller
The FAN7602 is a green current mode PWM controller. It is specially designed for off-line adapter application, DVDP, VCR, LCD monitor application, and auxiliary power supplies. The internal high-voltage start-up switch and the burstmode operation reduce the power loss in standby mode. Because of the internal start-up switch and the burst mode, it is possible to supply 0.5W load, limiting the input power to under 1W when the input line voltage is 265V AC. On no-load condition, the input power is under 0.3W. The maximum power can be limited constantly, regardless of the line voltage change, using the power limit function. The switching frequency is internally fixed at 65kHz and the frequency modulation technique reduces EMI. The FAN7602 includes various protections for the system reliability and the internal soft-start prevents the output voltage overshoot at start-up.
1 LUVP  - Line Under-Voltage Protection Pin. This pin is used to protect the set when the input voltage is lower than the rated input voltage range.
2 Latch/Plimit  - Latch Protection and Power Limit Pin. When the pin voltage exceeds 4V, the latch protection works. The latch protection is reset when the VCC voltage is lower than 5V. For the power limit function, the Over-Current Protection (OCP) level decreases as the pin voltage increases.
3 CS/FB - Current Sense and Feedback Pin. This pin is used to sense the MOSFET current
for the current mode PWM and OCP. The output voltage feedback information and
the current sense information are added using an external RC filter.
4 GND - Ground Pin. This pin is used for the ground potential of all the pins. For proper oper ation, the signal ground and the power ground should be separated.
5 OUT - Gate Drive Output Pin. This pin is an output pin to drive an external MOSFET. The peak sourcing current is 450mA and the peak sinking current is 600mA. For proper operation, the stray inductance in the gate driving path must be minimized.
6 V CC Supply - Voltage Pin. IC operating current and MOSFET driving current are supplied using this pin.
7 NC - No Connection.
8 Vstr  - Start-up Pin. This pin is used to supply IC operating current during IC start-up. After start-up, the internal JFET is turned off to reduce power loss.
SMPS NOTES
D.C. to DC convertor and DC to AC converter belong to the category of switched mode power supply (SMPS). The various types of voltage regulator used in linear power supplies (LPS), fall in the category of dissipative regulator, as they have a voltage control element usually transistor or zener diode which dissipates power equal to the voltage difference between an unregulated input voltage and a fixed supply voltage multiplied by the current flowing through it. The switching regulator acts as a continuously variable power converter and hence its efficiency is negligibly affected by the voltage difference. hence the switching regulator is also known as “non-dissipative regulator” in a SMPS, The input DC supply is chopped at a higher frequency around 15 to 50KHz using an active device like the BJT power MOSFET or SCR and the convertor transformer There are three basic switch regulators 1.Step down or buck switching regulators. 2.Step up or boost switching regulator. 3.Inverting type switching regulator
COMMON LED DRIVE WORKING
There are large arrays of LEDs located behind the LCD panel in a typical LCD TV LED. In this array are a large number of parallel channels of LEDs connected in series depending on the size of the TV and the type of backlighting, for example edge backlighting (less LEDs but more in series) or direct backlighting (more LEDs in parallel) . The LED voltage (VLED) is provided by the White LED Backlight Driver Board to each LED channel and is regulated to a level needed by the highest voltage required to maximize the light output of each LED string . Depending upon the power supply requirements determined by the number of LEDs in the string or grouping of parallel LED strings, the up-stream power source for the LED backlight driver board may be a DC/DC step-up boost converter, a DC/DC step-down converter or more commonly an AC/DC converter . In the case where supply voltage is lower than the required VLED, a step-up boost converter will be used . As an example, a LED boost converter LED backlighting system will be described in detail in this paper for a direct backlighting application, however the theory of operation will also apply to both the step-down converter and AC/DC converter situation .
High brightness LEDs used in LCD backlighting require high LED current which also equates to higher LED forward voltage . For example, if a user wants to set the LED current to 80mA maximum, a minimum of 3 .65V forward voltage must be provided to each LED in the string . If the power supply can only provide 3 .6V to each LED, then the maximum LED current is limited to 74mA .
POWER SUPPLY SCHEMATICS 

LED DRIVER SCHEMATIC 
CLICK ON THE IMAGES TO ZOOM IN 

SONY KDL-32R420 - How to activate Service mode - LED blinking codes and causes - Service mode adjustments - Lcd television repair and service - Service Tips

Category: LCD Television Repair and Service 

Contents of this article 

  • How to enter to service mode
  • LED blinking and causes 
  • Service adjustments  


SONY KDL-32R420

HOW TO ENTERING SERVICE MODE
 1) Turn on the main power switch to place this set in standby mode.
2) Press the buttons on the remote commander as follows, and entering service mode.
DISPLAY > CHANNEL 5 > VOLUME +  > TV POWER
3) Service mode display. Note: First of all, when you enter Service Mode, you can see “Digital” service mode. Whenever you press “OPTIONS” or “JUMP” on remote, each service mode is changed. “Digital” -> “Chassis” -> “Sub”
WHITE BALANCE ADJUSTMENT
Change Data of “Digital” service mode. (“006 WB” category)
a. Press “0” or “10” on remote to enter WB adjustment mode.
b. Press number key “1”>”6” directly. “*” stamp move.
c. Press “12 / enter / select” to decide and advance next step. When returning on the previous page, press “return”.
 d. Change data by number key “0”>”9” directly. (0-255)
 e. Press “12 / enter / select” to save data. It shows red “WRITE”. It indicate writing is processing.
 f. Writing process is done at this point.
SAVE CHANGING DATA
1) Change Data of “Chassis” or “Sub” service mode
 2) Write data for “Chassis” or “Sub” service mode
a. Press “Mute” on remote. It shows green “SERVICE” changes to green “WRITE”.
b. Press “0” or “enter” on remote. Green “WRITE” changes to red “WRITE”. It indicate writing is processing.
c. After a while, red “WRITE” changes to green “SERVICE”. Writing process is done at this point.
3) TV reboot is necessary for applying data change.
CHANGE DATA
Note: “Digital” service mode don’t have to Save. (except “002 MODEL” category)
1) Change Data of “Digital” service mode. (except “003 DIG_SRV_MODE” category)
a. Press “2 / 5” on remote to select (up / down) category.
b. Press “1 / 4” on remote to select (up / down) Item. c. Press “0 / 10” on remote to select item.
2) Change Data of “Digital” service mode. ( “003 DIG_SRV_MODE” category) “003 DIG_SRV_MODE” is one category of “Digital” service mode. Please note because this operation is special.
 a. Press “2 / 5” on remote to select “003 DIG_SRV_MODE”.
b. Press “1 / 4” on remote to select (up / down) Item.
c. Press “0 / 10” on remote to select item.
d. Press number key “1”>”9” directly. “*” stamp move.
e. Press “12 / enter / select” to decide and advance next step. Press “return”, when returning on the previous page.
3) Write data for “Digital” service mode. ( “002 MODEL” category) Note: This procedure operation, when replaced the B board. Note: Do not write a wrong segment or destination information in Product ID. When the wrong setting is written, TV may not operate.
000 SEG ....Product ID - segment information
001 DEST.....Product ID – destination information
a. Change data for each model.
b. Press “0” or “enter” on remote. It shows red “WRITE”. It indicate writing is processing.
c. Writing process is done at this point.
SET TO SHIPPING CONDITION
How to do shipping condition.
a. Move to “Digital” service mode.
 Press “8” on remote.
It shows green “SERVICE” changes to green “RST-”.
Press “mute” on remote.
Added green “EXE” after green “RST-” .
d. Press “0” or “enter” on remote. Green “EXE-RST” changes to red “EXE-RST”. It indicate writing is processing.
After a while, red “EXE-RST” changes to green “SERVICE”.
And all LED lights.
Writing process is done at this point.
SELF DIAGNOSIS FUNCTION
The units in this manual contain a self-diagnostic function. If an error occurs, the STANDBY LED will automatically begin to flash. The number of times the LED flashes translates to a probable source of the problem. A definition of the STANDBY LED flash indicators is listed in the instruction manual for the user’s knowledge and reference. If an error symptom cannot be reproduced, the remote commander can be used to review the failure occurrence data stored in memory to reveal past problems and how often these problems occur.
DIAGNOSTIC TEST INDICATORS 
When an error occurs, the STANDBY LED will flash a set number of times to indicate the possible cause of the problem. If there is more than one error, the LED will identify the first of the problem areas. Result for all of the following diagnostic items are displayed on screen. If the screen displays a “0”, no error has occurred .
LED BLINKING AND POSSIBLE CAUSES 
STBY LEDFlash time
Service menu Item name (Screen Display)
Diagnostic Item Description
2
MAIN_POWE
Main Power Over Voltage Protection
3


DC_ALERT
DC_ALERT
DTT_WDT
DTT Error
AUD_PROT
Audio Abnormal Detection
4
BALANCER_
Panel Balancer Error
5


TCON_ERR
T-CON Error
HFR_ERR
HFR Error
P_ID_ERR
Panel ID NVM Error
6
BACKLITE_
Back Light Error 
7


TEMP_ERR
Thermal Error
FAN_ERR
FAN Error 
8
-
Not used
9
-
Not used
10
-
Not used
11
-
Not used
12
-
Not used
-
RGB_SEN
RGB Sensor ACK Error
SELF-DIAGNOSTIC SCREEN DISPLAY 
For errors with symptoms such as “power sometimes shuts off” or “screen sometimes goes out” that cannot be confirmed, it is possible to bring up past occurrences of failure for confirmation on the screen:
To Bring Up Screen Test

 In standby mode, press buttons on the remote commander sequentially in rapid succession as shown below:
DISPLAY > CHANNEL 5 > VOLUME –  > TV POWER
Since the diagnostic results displayed on the screen are not automatically cleared, always check the self-diagnostic screen. After you have completed the repairs, clear the result display to “0”. Clearing the Self Check Diagnostic List 1. Error history and Error count : Press the Channel 8 => Channel 0 . 2. Panel operation time : Press the Channel 7 => Channel 0 .
Exiting the Self-diagnostic screen 
To exit the Self Diagnostic screen, turn off the power to the TV by pressing the POWER button on the remote or the POWER button on the TV.